Last weekend I started playing with the new Qt 5 particle effect system. One interesting effect I found in the examples was using custom particles and OpenGL shaders to color the moving particles, producing a cool-looking image on the screen made of “live” pixels. For this blog entry I have drawn an image of a skull, which in the example gets rotated and scaled across easing curves to further enhance the effect and finally fed to the particle system.
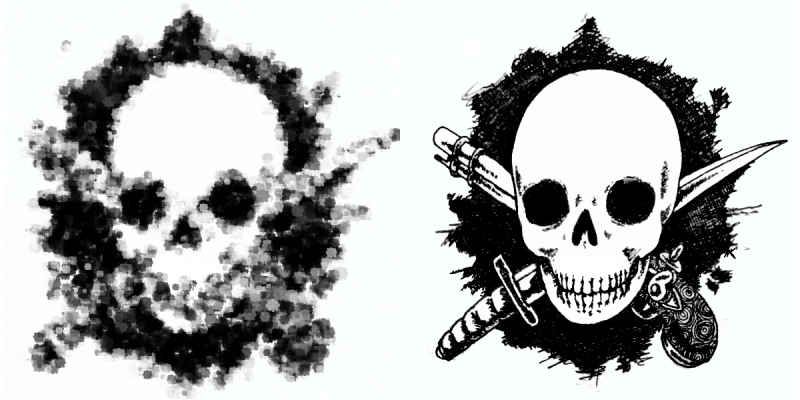
The original drawing with and without the effect
Show code »
livepixels.qml:
import QtQuick 2.0
import QtQuick.Particles 2.0

Rectangle{
    width: 800; height: 480
    ParticleSystem {
        width: image.width
        height: image.height
        anchors.centerIn: parent
        Emitter {
            size: 15
            sizeVariation: 10
            speed: PointDirection { xVariation: 8; yVariation: 8 }
            emitRate: 10000
            lifeSpan: 2000
            anchors.fill: parent
        }
        CustomParticle {
            property real maxWidth: parent.width
            property real maxHeight: parent.height
            property variant particleTexture: ShaderEffectSource {
                sourceItem: Image { source: "particle.png" }
                hideSource: true
            }
            property variant pictureTexture: ShaderEffectSource {
                sourceItem: sourceImage
                hideSource: true
                live: true
            }
            vertexShader:"
                uniform highp float maxWidth;
                uniform highp float maxHeight;
                varying highp vec2 fTex2;
                varying lowp float fFade;
                uniform lowp float qt_Opacity;

                void main() {
                    fTex2 = vec2(qt_ParticlePos.x / maxWidth, qt_ParticlePos.y / maxHeight);
                    highp float t = (qt_Timestamp - qt_ParticleData.x) / qt_ParticleData.y;
                    fFade = min(t*4., (1.-t*t)*.75) * qt_Opacity;
                    defaultMain();
                }
            "
            fragmentShader: "
                uniform sampler2D particleTexture;
                uniform sampler2D pictureTexture;
                varying highp vec2 qt_TexCoord0;
                varying highp vec2 fTex2;
                varying lowp float fFade;
                void main() {
                    gl_FragColor = texture2D(pictureTexture, fTex2) * texture2D(particleTexture, qt_TexCoord0).w * fFade;
            }"
        }
    }
    Item {
        id: sourceImage
        width: image.width; height: image.height
        anchors.centerIn: parent
        Image{
            id: image
            source: "skull.png"
            scale: 1 + 0.15*Math.random()
            Behavior on scale {
                NumberAnimation { duration: 3000; easing.type: Easing.InOutQuad }
            }
            Timer {
                interval: 3000
                repeat: true; running: true
                onTriggered: parent.scale = 1 + 0.15*Math.random()
            }
            transform: Rotation {
                id: rotation
                property real value: Math.random()
                property bool reverse: Math.random() > 0.5
                origin.x: image.width/2; origin.y: image.height/2
                axis.x: Math.random() < 0.2 || value < 0.5
                axis.y: Math.random() < 0.2 || value >= 0.5
                SequentialAnimation on angle {
                    loops: Animation.Infinite
                    NumberAnimation {
                        from: 0.0; to: rotation.reverse ? -8.0 : 8.0
                        duration: 2500; easing.type: Easing.InOutQuad
                    }
                    NumberAnimation {
                        from: rotation.reverse ? -8.0 : 8.0; to: 0.0
                        duration: 2500; easing.type: Easing.InOutQuad
                    }
                }
            }
        }
    }
}
Nice example about using particle effect system!
btw, would it be possible to have the live pixels effect only affecting to certain part of an image at a time (and even changing the effect area on the fly)?
Expecting to see more nice examples/demos…
> Would it be possible to have the live pixels effect only affecting to certain part of an image at a time?
Yes, for example by feeding the result into a mask shader and changing the masking area on the fly or somehow combining particle shader and masking functionality together in one shader program.